Today I will describe my attempt at stereo imaging.
Frankly, people have been about stereo imaging since ages, but as I said in the About me page, some things described here are less likely to be found at well-established sources. These include -
- Using the PointCloud Library to visualize your pointclouds 'live'
- How to get 640*480 frames at a decent frame rate from the Minoru (experienced people might recognise that since the Minoru connects through a normal USB port, OpenCV's VideoCapture class will not allow you to capture 640*480 frames - you will have to reduce them to around 480*360)
- An explanation of various parameters involved in the Block Matching algorithm that OpenCV uses for stereo correspondence
- How to get actual distance in centimeters from your stereo system
I used for the project -
- Minoru 3D webcam: A low cost solution for dummies (like I was when I first started out). It is just two 640*480 cameras in one, both delivering a maximum frame rate of 30. However, there is just one USB out and hence frames from the left and right cameras have to be accessed on a time-sharing basis. Add to that OpenCV's typical routines to access cameras, and most probably you will have to reduce the frame size (more on ways to get around that later). But hey, it just costs you around 40 British Pounds at Firebox. Lucky people with a relaxed budget might want to consider the Bumblebee stereo camera from PointGrey Research.
- OpenCV: The version I used was 2.3.1. The standard library for computer vision, it will be used for almost all of the computation work.
- PointCloud Library: I used this handy library to visualize my pointcloud in real-time. A pointcloud is just a 2D array with all sorts of information (here, X Y and Z values in physical units) stored for each array element.
- libv4l2cam: This small library plays a vital role in the project. It allows us to capture 640*480 frames from the Minoru, at a decent rate (I haven't measured it, but it seemed close to 10 fps). Why this is important is because OpenCV, with its VideoCapture class, does not in any way allow me to get 640*480 frames from the Minoru. Here, size does matter because I have experienced that calibration results get poor with smaller images. Reduce the size and you will get improvements in the frame rate.
- A Linux computer. I used Ubuntu 11.04.
Before proceeding you might want to download the codes. (This link contains codes for only the real-time program, codes for caalibration can be obtained from Martin Peris' blog as mentioned below)
Like me, some people might want to check if the system gives satisfactory point clouds before buying the Minoru. Or, again like me, some might have to show preliminary results before getting funded for the Minoru. I have put up a set of stereo chessboard image pairs for them (640*480 or 320*240). You can use these pairs to get calibration matrices and hence point clouds for individual pairs. Please note that they have been taken by my Minoru 3D webcam and chances are that yours is not exactly the same as mine (even focus changes are important!). So, do NOT use the calibration results you get from these images in your system if you are using your own camera. Calibrate your camera yourself.
Also, you will need to install OpenCV 2.3.1, PCL 1.2 and libv4l2cam. There are excellent guides available for installing OpenCV on Ubuntu, I recommend Sebastian Montabone's excellent blog. The readme file in the folder that you get by downloading from the link to libv4l2cam that I provided above will give you instructions on how to install it.
Calibration - the 'beforehand' part
Calibration here just means calculating various parameters associated with the two cameras and your stereo set-up. There are a lot of these parameters that the code will compute (and use), like the focal lengths in X and Y directions (X horizontal, Y vertical, Z into the screen), image centers, distortion parameters, rotation and translation vector between the two cameras and more. All of them will be in the form of matrices. I do not want to delve deeper into the math part of how OpenCV calculates these parameters because it is well explained in my thesis (which relies heavily on the book Learning OpenCV). The code for stereo camera calibration is pretty standard and freely available. I suggest newbies to take the help of Martin Peris' excellent blog on it, here. For the 'real-time' part of the code (see below), you will need this calibration code to store the following in XML format: the 4 mapping matrices (obtained as a result of calls to the cvInitUndistortRectifyMap function) and the Q matrix. I believe Martin's code does this, and names them mx1, mx2, my1, my2 and Q (.xml, of course!).
For calibration you will need a set of at least 20 pairs of images of a chessboard taken by a stereo camera - left and right, and they must of the same size as that of the frames you plan to capture from your camera in real-time. For best results move the chessboard around - tilt it around all the three axes, and vary the distance from the camera. But take care that all the inner corners are visible in all images, and if possible have a white border around the chessboard.
For calibration you will need a set of at least 20 pairs of images of a chessboard taken by a stereo camera - left and right, and they must of the same size as that of the frames you plan to capture from your camera in real-time. For best results move the chessboard around - tilt it around all the three axes, and vary the distance from the camera. But take care that all the inner corners are visible in all images, and if possible have a white border around the chessboard.
Calibration takes a fair bit of time (I took about 10 seconds), so it is better to have a separate program to access the 20 pairs, compute calibration matrices, and save the important ones in XML format using OpenCV's IO module beforehand. These XML files can then be pulled by another program (this one runs real-time) to capture frames, calculate X Y Z values, and display point clouds.
Visualising depth - the 'real-time' part
Visualising depth - the 'real-time' part
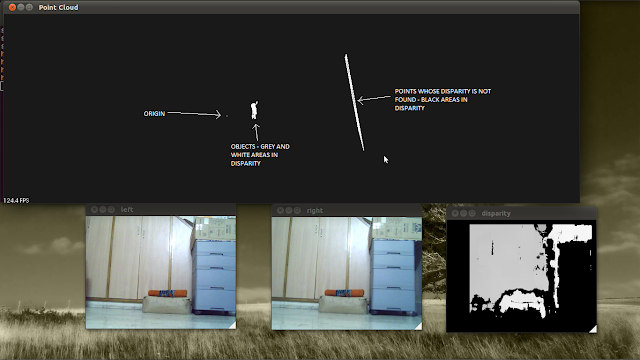
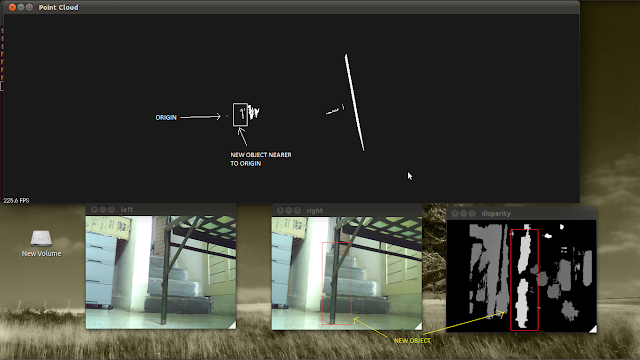
This is the program that will run in a continuous loop and keep showing you the left and right original images, the grey-coded disparity image and the point-cloud, all real-time! Here are the files that you will be needing. So how do you set it up on your Linux computer? This can be confusing, because this program needs to pull functions from three different libraries - OpenCV, PCL and libv4l2cam. Hence a CMakeLists.txt file is needed.
First, create a separate folder, say minoru_stereo preferably in your Home folder. place the main.cpp and CMakeLists.txt in this folder. Also make another directory called build in the folder minoru_stereo. Importantly, place the 5 XML files that you got from the calibration program into this directory. Edit the part of main.cpp (lines 25 to 30) where you load the 5 XML files, to reflect the filenames of your files. Now open the Terminal and navigate into the build directory, and execute 'cmake ..' and 'make' (without the quotes) one after the other. This should create an executable called minoru_stereo_PCL in the build directory - execute it by typing ./minoru_stereo_PCL in the Terminal.
If you have a look at main.cpp, you will discover that getting 640*480 frames from the Minoru using the libv4l2cam is really easy. What we are essentially doing in this simple program is loading the four mapping matrices that calibration gave us, using these mapping rules to remap succesive frames coming from the Minoru and finding disparities using the Block Matching algorithm (more on that later). Then, for visualization we get 3D co-ordinates using an OpenCV function, copy them to a pointcloud data-structure that PCL's visualizer will understand, and display the pointclouds as they are filled!
If you have a detailed look at main.cpp, you will notice that after copying the X Y Z values to the point cloud (line 117 to be precise), I have set the centre of the cloud to (0,0,0). This gives a point that 'stands out' in your pointcloud, and this point is nothing but your camera! So now you have a 'reference' in your pointcloud too.
BMState parameters
Lastly, I would like to discuss two important paramerters of the BMState class used for stereo correspondence - minDisparity and numberOfDisparities. I assume you are familiar with how the Block Matching algorithm works, if not, I suggest you first go through the Stereo Correspondence section in the book Learning OpenCV. Anyway, stereo correspondence is simply finding a point in a line in the right image, that matches a point in a corresponding line in the left image. Finding the difference in their positions, you get the disparity. For example, take a point in the left image. Its matching point is most likely to be to the left of a similar position in the right image - the more on the left, the greater the disparity (and the greater the disparity, the lesser the depth). Negative disparities lie to the right of this 'similar position'. Now, minDisparity just tells OpenCV where to start searching from and OpenCV always searches to the left of this specified position. Generally you would want to search starting from the 'similar position': hence, generally you would want to set minDisparity to 0. Only if your cameras are angled towards each other, would you want to search starting from the right of the zero-disparity position. If such is the case, set your minDisparity to a negative value.
We now know how to tell OpenCV where to start searching for correspondence from. But till how long? This is set by numberOfDisparities - its value indicates the number of pixels OpenCV will search to the left of the starting position. Searching the entire line to the left of the position you specify by minDisparity is a waste of resources.
Generally, (((image_width/8) + 15) & -16) is good enough. But, if you want your setup to work for very nearby objects, you should set numberOfDisparities to a larger value, because as I said earlier, disparity is inversely proportional to depth. Of course, searching for more points would consume more time. For an explanation of other parameters associated with BMState, read the Learning OpenCV chapter on Stereo Correspondence.
Distance
How do you find the actual distance in physical units from disparity? The starting point would be the OpenCV function cvReprojectImageTo3D which takes disparity and the reprojection matrix Q and gives you X, Y and Z values for every point for which a disparity was found.
Now suppose that you have an area in your disparity image that you want to find the distance of. This area (ROI) could be the result of an object detection program and will be an object of the type Rect in OpenCV.
In this area, most of the distance values will be erroneous (especially if you're using a low-quality camera) - and these erroneous values will stay constant irrespective of the distance of the object. So to get the correct information we want to filter out those points that show a constant distance. Simple averaging should do it. Here's how its done:
- Find the average distance of all points within the ROI:
Mat xyz;
reprojectImageTo3D(disp32, xyz, Q, true);
int ch[] = {2, 0};
Mat z(xyz.size(), CV_32FC1);
mixChannels(&xyz, 1, &z, 1, ch, 1);
float dist = 0; unsigned long int npts = 0;
for (int i = 0; i < z.rows; i++)
{
for (int j = 0; j < z.cols; j++)
{
mixChannels(&xyz, 1, &z, 1, ch, 1);
float dist = 0; unsigned long int npts = 0;
for (int i = 0; i < z.rows; i++)
{
for (int j = 0; j < z.cols; j++)
{
if (roi.contains(Point(j, i)) && z.at<float>(i, j) > -500.0 && z.at<float>(i, j) < 500.0)
{
dist += z.at<float>(i, j);
npts++;
}
}
{
dist += z.at<float>(i, j);
npts++;
}
}
}
dist /= npts; //this is the average distance
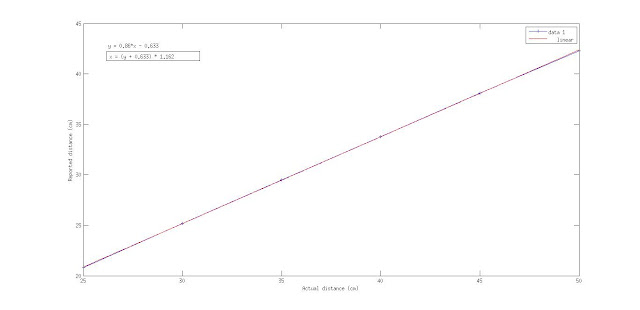
- Keep the object at known distances from the camera and note the distances reported by program. Once you collect 5 or 6 such pairs, plot them in Matlab and use simple curve fitting tools to generate a linear fit. The plot should be linear and should be something like the figure above. From this you can get an equaton that gives actual distance from the reported average distance. Here it is,
depth = 1.1561 * ((-dist/npts) - 0.124);


